
Basement walkouts are exterior entrances built at or below grade to give a basement direct access to the outdoors through a stairwell or sloped exit. They improve egress, natural light, and independent access. For The Meadows homes in Edmonton, walkouts also support safe evacuation and flexible use, including potential secondary suites when planned correctly.
By Sandeep Singh — SSJ Construction & Renovations
Last updated: 2026-06-23
Above the Fold: Start Here + Table of Contents
Use this guide to plan a code-ready basement walkout that stays dry, safe, and welcoming. You’ll see layouts, drainage and waterproofing must‑dos, common mistakes, and a simple build sequence our Edmonton team uses to deliver dependable results on time and with clear communication.
Here’s how this complete guide helps you make confident decisions quickly.
- Understand the basics: What a basement walkout is and why it matters in The Meadows.
- See options: Compare straight, L-shaped, switchback, and sloped layouts.
- Build it right: Learn drainage, frost, retaining walls, and waterproofing essentials.
- Avoid rework: Read the most common pitfalls and how SSJ prevents them.
- Plan the work: Follow our step-by-step construction process and checklists.
- What Is a Basement Walkout?
- Why Basement Walkouts Matter
- How a Walkout Works (Structure, Drainage, Code)
- Types of Walkout Layouts
- Best Practices for Design, Waterproofing, and Safety
- Tools, Permits, and Resources
- Case Studies from SSJ Projects
- Frequently Asked Questions
- Conclusion and Key Takeaways
What Is a Basement Walkout?
A basement walkout is an exterior-grade entrance that connects a basement directly to the outdoors via a stairwell or sloped path. Done right, it adds legal egress, daylight, ventilation, and independent access—turning an underused level into livable space that feels connected to the yard.
A clear definition sets the stage for better planning and fewer surprises.
- Core components: Exterior door, stairwell or sloped exit, retaining walls, drain at the stair landing, waterproofing, and lighting.
- Primary functions: Safe egress, more daylight, direct access for residents or tenants, and improved resale appeal.
- Typical context in The Meadows: Homes with partial or full basements that benefit from a separate side or rear entrance without major disruption to the main floor.
In our experience finishing and developing basements across Edmonton, the walkout design affects everything else—layout flow, moisture control, and even how you run plumbing and electrical to serve a future suite or recreation space.
Why Basement Walkouts Matter for The Meadows Homes
Basement walkouts expand livable space, make exits safer, and unlock design flexibility for suites or studios. In The Meadows, they also support winter access, reduce tracked-in mess, and improve natural light—all while helping future-proof a renovation with a dedicated exterior door.
Here’s why walkouts deliver outsized value for homeowners near The Meadows.
- Safety and compliance: A dedicated exterior exit improves emergency egress and supports planning for legal suites where permitted.
- Daylight and comfort: Full-height glass doors and a lighter stairwell increase perceived room size and reduce the “basement feel.”
- Access and privacy: Residents, guests, or renters can come and go without crossing main-floor zones.
- Season-ready living: Protected stairwells and proper drainage reduce icy buildup and slush transfer during Edmonton winters.
- Future flexibility: A walkout entrance simplifies deliveries for renovations, new flooring, or appliances later on.
We’ve found that clients who start with a clear exit strategy design the rest of their basement finishing with fewer compromises—especially when coordinating plumbing rough-ins or electrical panels for a future kitchenette, bath, or laundry.
How a Walkout Works (Structure, Drainage, Code)
A walkout relies on three systems working together: structure to retain soil, drainage to move water away, and code-appropriate egress. When the walls, waterproofing, and drains are integrated, the stairwell stays dry, safe, and functional through freeze‑thaw cycles.
Let’s break down the major systems so you can evaluate your site with confidence.
Structural elements
- Retaining walls: Cast-in-place concrete or masonry units resist lateral soil pressure. Reinforcement patterns align with wall height and soil conditions.
- Stairwell geometry: Straight, L-shaped, or switchback stairs set the footprint and determine wall height and handrail locations.
- Door opening: Cutting a new opening in a concrete foundation requires proper lintel support and precise waterproof detailing around the frame.
Waterproofing and drainage
- Waterproof membrane: A continuous membrane on foundation walls reduces seepage. Seams and terminations at the door are critical.
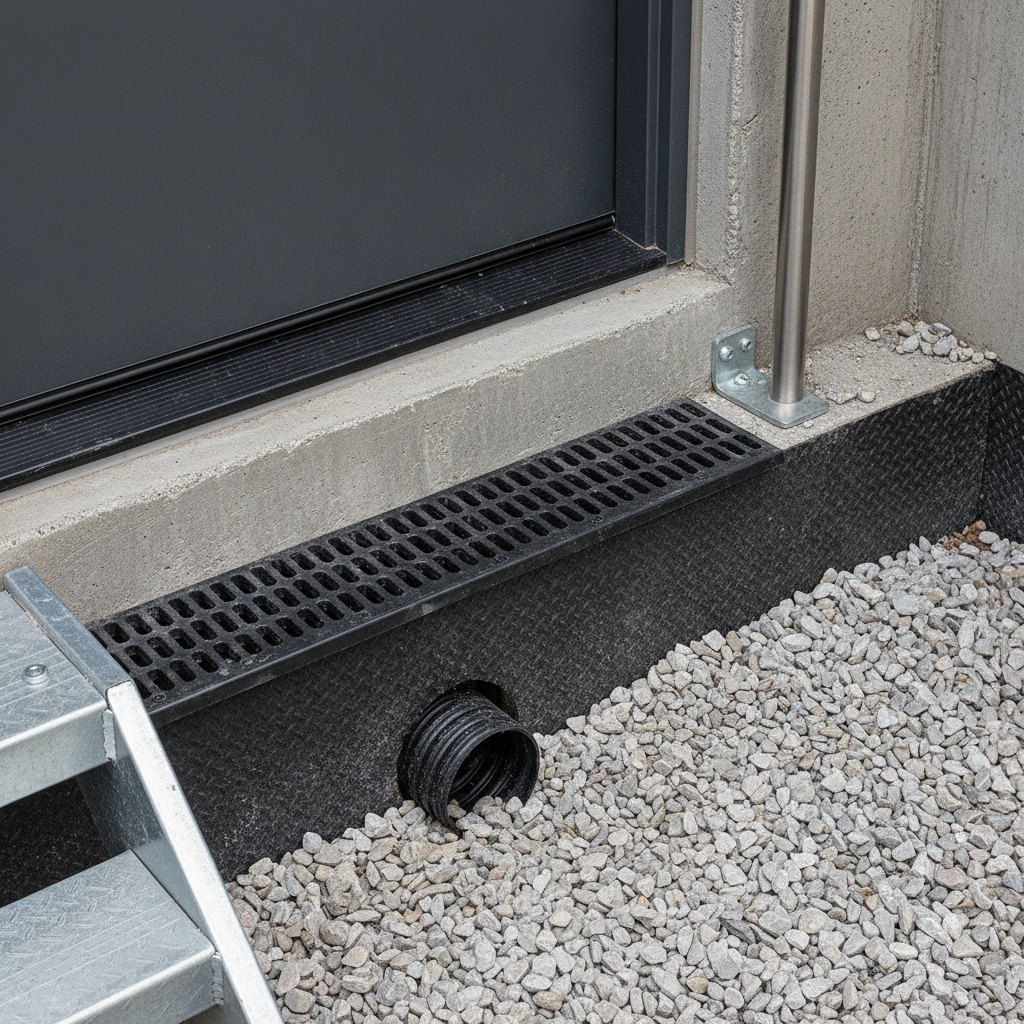
- Gravel base and drain: Free-draining gravel under the landing with a drain to a sump or storm line helps prevent pooling.
- Surface slope: Treads and landings should shed water at roughly 1–2% (about 1/8–1/4 inch per foot) toward a drain.
Code and egress considerations
- Clear widths and headroom: Door and stair dimensions must support safe passage and meet applicable codes in your jurisdiction.
- Handrails and guards: Continuous handrails and code-height guards reduce fall risk on exposed sides.
- Lighting: Weather-rated fixtures and switches placed near the door and stair entry improve safety at dusk and in winter.
For context on framing and egress themes discussed by builders, see the practical code notes in these basement framing rules. While details vary by municipality, the principles—clearance, protection from moisture, and safe travel—are consistent goals.
Types of Basement Walkout Layouts
Choose a layout that fits your lot, soil, and interior plan. Straight runs are compact, L-shapes turn corners, switchbacks fit tight yards, and sloped walkouts trade steps for a longer ramped grade. The best choice balances drainage, headroom, privacy, and construction access.
Below are common layouts we evaluate on walkout projects across Edmonton.
Straight-run stairwell
- Where it excels: Simple foundations with unobstructed side yard access.
- Advantages: Least complex to form; direct sightline and drainage path.
- Watchouts: Can feel exposed; snow drift control and wind-driven rain need attention.
L-shaped stairwell
- Where it excels: When you want privacy from the main yard or to avoid existing utilities.
- Advantages: Breaks wind and improves privacy; lets you stage a drain at the inside corner.
- Watchouts: Interior landing must drain cleanly; corners concentrate water if not sloped correctly.
Switchback (U-shaped) stairwell
- Where it excels: Tight lots with setback limits or landscaping constraints.
- Advantages: Short exterior footprint; guard opportunities on upper flight.
- Watchouts: More formwork; extra landing requires meticulous waterproofing and clear headroom.
Sloped walkout (at-grade transition)
- Where it excels: Naturally sloped yards where you can step down the grade gradually.
- Advantages: Fewer enclosed walls; more daylight; easier snow clearing.
- Watchouts: Requires longer excavation and careful grade ties to avoid surface water running back to the door.
| Layout | Best for | Footprint | Privacy | Drainage complexity |
|---|---|---|---|---|
| Straight-run | Simple side yards | Short | Low | Low |
| L-shaped | Corner turns, utilities | Medium | Medium–High | Medium |
| Switchback | Tight setbacks | Compact | High | High |
| Sloped walkout | Naturally sloped lots | Long | Medium | Medium |
Best Practices for Design, Waterproofing, and Safety
Plan drainage first, then structure, then finishes. Protect the door opening, slope every surface to a drain, and isolate soil pressure with reinforced walls. Add handrails, lighting, and slip resistance. This sequence prevents moisture issues and keeps daily use safe year‑round.
Design and layout
- Start with setbacks and utilities: Confirm clearances, easements, gas meters, and downspouts before you choose a layout.
- Right-size the landing: Leave space to open the door fully without stepping onto a stair tread.
- Privacy and sightlines: Aim walls or turns to reduce direct views into living areas.
Waterproofing details
- Continuous membrane: Lap a waterproof membrane behind flashings and door thresholds; terminate above grade cleanly.
- Redundant drainage: Combine a stair drain with free-draining gravel and a sump connection where required.
- Seal penetrations: Every fastener and conduit penetration gets sealed to prevent capillary leaks.
Safety and winter use
- Slip resistance: Use textured treads and consider snow-melt strategies or grit storage at the landing.
- Lighting: Weather-rated LEDs with motion or photo sensors improve visibility in short winter days.
- Handrails and guards: Provide graspable rails and guardrails where the drop exceeds typical thresholds.
Local considerations for The Meadows
- Plan snow management if your walkout faces prevailing winds across open green space near Silver Berry Park.
- Schedule excavation and concrete work after spring thaw; freeze‑thaw cycles can shift soils and affect forming.
- Coordinate material staging and safe pedestrian routes if your site is close to Laurel Park weekend traffic.
For a practical overview of separate-entrance pitfalls and sequencing, the field tips in this separate entrance guide echo what we implement: protect the opening, form accurately, and drain redundantly.
Soft CTA: Get a basement walkout assessment
If you’re weighing two or three layouts, we can review setbacks, utilities, and grading, then provide a clear plan that aligns with your basement finishing goals. Our owner-led approach means you get transparent updates and a dependable schedule.
Tools, Permits, and Resources
Successful walkouts depend on the right tools, a clean permit path, and coordinated trades. Use a clear checklist, confirm inspections, and align plumbing, electrical, and finishing plans so the entrance integrates with your future basement layout.
Essential tools and materials
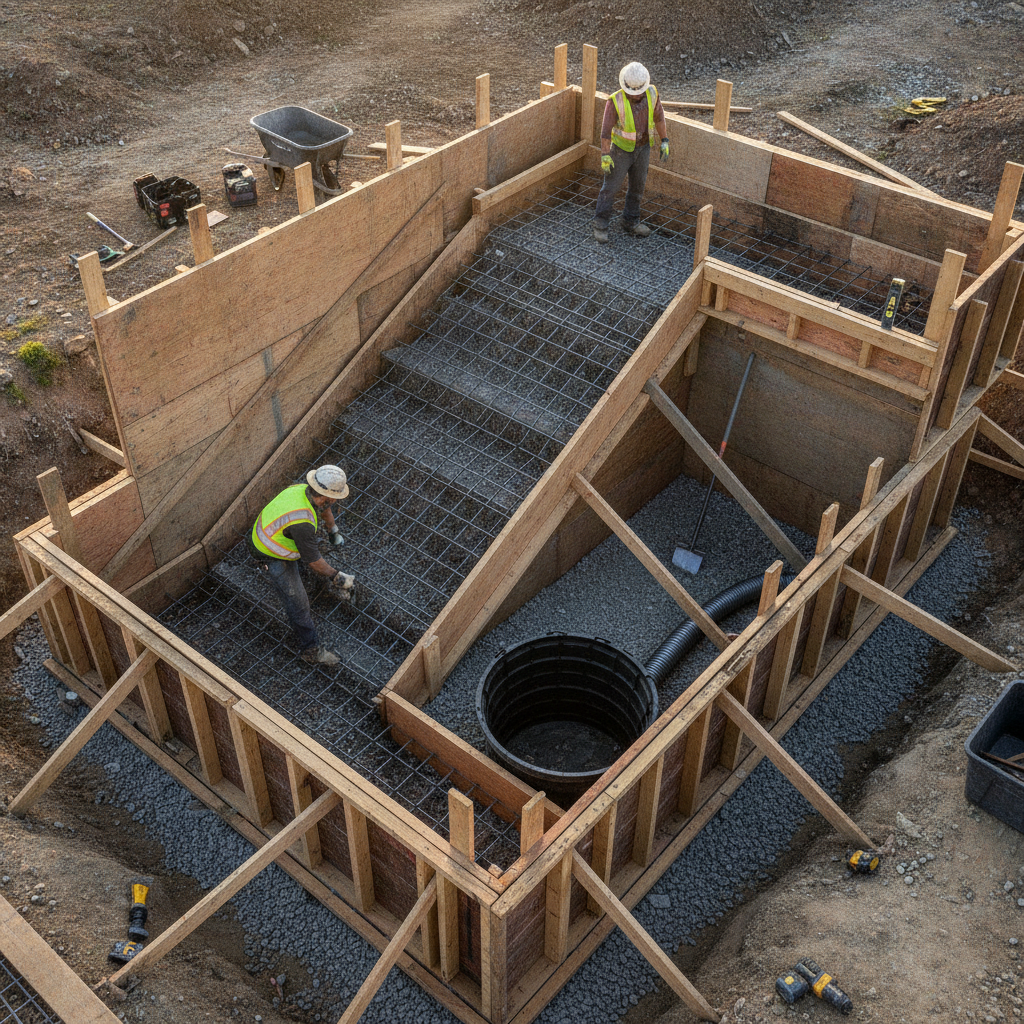
- Excavation and forming: Excavator, plate compactor, laser level, rebar bender, formwork panels, and ties.
- Drainage assembly: Drain box with grate, PVC or ABS lines, gravel base (washed), geotextile, and sump components.
- Waterproofing: Self-adhered membrane, primer, termination bars, sealants, and flashing.
- Safety gear: Shoring where needed, fall protection, eye/hand protection, and rated ladders.
Permits and inspections
- Structural approval: Cutting a foundation wall typically requires engineered drawings and an inspection of reinforcement.
- Drainage tie-ins: Plan for a sump or approved storm connection; record locations for future maintenance.
- Electrical and plumbing: Weather-rated lighting and any nearby plumbing routes should be on drawings to avoid rework later.
For a homeowner-oriented overview of permit paths, scope planning, and how entrances affect value, see this basement renovations guide. It reinforces the importance of permitting and integrated planning early on.
Process: step-by-step build sequence
- Assess site and utilities: Verify setbacks, grading, and utility locates.
- Engineer and permit: Finalize drawings for the opening, walls, and drainage.
- Excavate and shore: Dig to depth; shore if soils require support.
- Form and reinforce: Build forms; place rebar per engineered details.
- Pour concrete: Place walls, landings, and treads; finish for slip resistance.
- Install drainage: Set drain box, pipe to sump/storm; backfill with washed gravel.
- Waterproof and flash: Membrane, flashing, and terminations around the door and walls.
- Fit the door and finishes: Hang exterior door, install handrails, lighting, and sealants.
Case Studies from SSJ Projects
Real projects show how design choices play out. These mini case studies highlight layout selection, waterproofing strategies, and coordination with basement finishing—so you can see what works in The Meadows and similar Edmonton neighborhoods.
Side-yard straight run for a future suite
- Challenge: Narrow side yard, tight setback to the fence, and an existing downspout nearby.
- Approach: Straight-run stair with a compact landing; redirected downspout; added drain to sump; motion lighting.
- Outcome: Clean egress and privacy maintained by a tall guard; interior plan reserved space for a future kitchenette.
L-shaped walkout with privacy turn
- Challenge: Direct views to the family room and prevailing winds in winter.
- Approach: L-shaped stairwell to block sightlines; textured treads; redundant drain at the inside corner.
- Outcome: Quieter entry with better wind protection and a brighter rec room through a full-height glass door.
Switchback in a compact yard
- Challenge: Mature landscaping and limited construction access.
- Approach: U-shaped stairs with careful formwork; staged concrete pour; handrails and guards for safe travel.
- Outcome: Code-ready egress that preserved trees and tied into a refreshed flooring and painting scope downstairs.
These decisions ripple across trades. When we plan walkouts alongside plumbing rough-ins and electrical upgrades, the basement finishing schedule runs smoother and inspection windows are easier to hit.
Frequently Asked Questions
Homeowners ask about permits, waterproofing, winter use, and layout choices. The short answers: plan permits early, double up on drainage, add winter-friendly lighting and traction, and choose a layout that fits your lot and future basement plan.
What is the difference between a basement walkout and a separate entrance?
A walkout is an exterior-grade exit built from the basement using a stairwell or sloped path. A “separate entrance” describes any dedicated entry to a suite or level. Many separate entrances are walkouts, but not all—some are interior stairs leading to a side door at the main floor.
How do you keep a walkout from flooding during heavy rain or snowmelt?
Use layered protection: slope treads and landing toward a drain, pipe the drain to a sump or approved storm line, and backfill with washed gravel. Add a continuous waterproof membrane and keep downspouts away from the stairwell. Redundancy is key for freeze‑thaw seasons.
Which layout works best for tight side yards?
Switchback stairs are often the most space‑efficient because the upper and lower flights overlap. L‑shaped runs can also work if you need to turn around utilities while improving privacy. We assess setbacks, window locations, and soil conditions before recommending a plan.
Do I need permits for a basement walkout?
Yes, a new foundation opening, retaining walls, and drainage changes typically require engineered drawings and permits. Inspections help verify structural support, waterproofing, and safe egress. Coordinating permits early keeps the schedule predictable.
Conclusion and Key Takeaways
The best basement walkout for your home balances safety, drainage, privacy, and daily use. Start with site constraints, choose a layout that fits, and integrate waterproofing and egress from day one. This approach delivers a dry, bright, and future‑ready lower level.
Key takeaways
- Pick a layout that respects setbacks, utilities, and interior flow.
- Design drainage first; slope everything to a reliable drain.
- Protect the opening with continuous waterproofing and flashing.
- Add winter-friendly lighting, traction, and handrails.
- Coordinate plumbing, electrical, flooring, and painting with your walkout schedule.
Next steps
- Walk your lot and sketch two potential layouts (straight vs. L‑shaped or switchback).
- Document downspouts, utilities, and grade changes that affect drainage.
- Request a walkout assessment so we can align permits, sequencing, and your basement finishing goals in The Meadows.
Field perspectives in this guide align with on-site best practices we apply across Edmonton. For additional reading on code themes and sequencing from trade publishers, see the practical notes shared in the resources referenced above: the framing rules article, the separate-entrance guide, and the homeowner renovations overview.
